THE CLEAN & JERK
this guide will help you to boost your barbell skills. we’ll dissect and develop the clean and jerk. Whether you’re a beginner or a veteran.
What is the clean & Jerk?
The clean and jerk is a movement used in Olympic weightlifting and CrossFit. It is made up of two parts: the clean, lifting the barbell from the floor to the shoulders and the jerk, moving the bar from shoulders to overhead.
Primarily executed with a barbell, these lifts can also be performed using dumbbells or kettlebells which make it more accessible and even easier to include in your workout routine.
Due to the explosive nature of the exercise the clean and jerk is arguably one of the best exercises to develop speed and power while strengthening the hamstrings, quadriceps, low back, abdominals, shoulders, and traps.
Here, we will discuss the key aspects of these two lifts and their variations with the aim of helping you to improve your understanding and technique.
How to approach learning the clean and jerk
Given that the clean and jerk are actually two lifts performed together, it can be challenging to execute both parts well. A solid clean helps to set up a successful jerk but even then, nothing is guaranteed.
It’s not always necessary to perform the lifts in sequence. In fact, off the competition platform, it’s quite typical to train these two lifts separately. This is because usually an athlete will have either a stronger clean or a stronger jerk. If we always train them together, the stronger lift will always be limited by the other or the weaker lift will be overloaded.
By isolating the clean from the jerk, we can train each of the lifts within a load range that will allow us to make progress.
Determining Intensity
Many training plans are programmed taking into account your one rep max. Your one RM or personal record (PR) lift refers to the maximal load with which you can perform any exercise. While WOD’s tend to have a prescribed weight (with the option to scale as necessary), most training plans are programmed with percentages relative to your PR.
When working towards improving the speed or technique of Olympic lifts, you’ll usually want to stay within 50-70% of your 1RM snatch or clean and jerk. The lifter will be able to control the weight, move consciously, and apply necessary corrections to the lifts. You should also stay within this range when performing reps at high volume (like in workouts) to ensure that you will be able to move with good form even while fatigued.
Strength and accumulation training happen within a 70 to 85% range. This offers a tougher intensity stimulus, but the lifter should still be able to control the load well.
Training above 90% should not be done often and is usually reserved for competition or new PR attempts.
Lifts will usually be in sets of 2 to 5 reps with rest in between.
If you’re new to Olympic lifts or you don’t know of your 1RM, a good solution is starting light to warm up and reinforce the technique and then gradually work up to heavier weights that still allow for quality and consistency.
For many novices, this will probably mean starting with a PVC pipe and working up to an empty bar.
Neglecting the natural progression will result in injury or developing bad habits. Proper execution in both clean and the jerk relies heavily on timing, positioning, control, and force output. There’s no sense in going too heavy too soon.
CLEAN grip, widtH and set up
The objective of the clean is to guide the bar’s path from the floor to the hips taking advantage of and aggressive hip extension to further accelerate the bar upwards.
In the clean, the athlete will take a narrow grip on the bar. That’s because instead of taking the bar directly overhead as in the snatch, the clean ends in front rack position; the bar supported across the athlete’s front deltoids. This sets us up for or jerk or overhead press afterwards.
A lot can happen between the floor and front rack so let’s look at the points of performance, first things first;
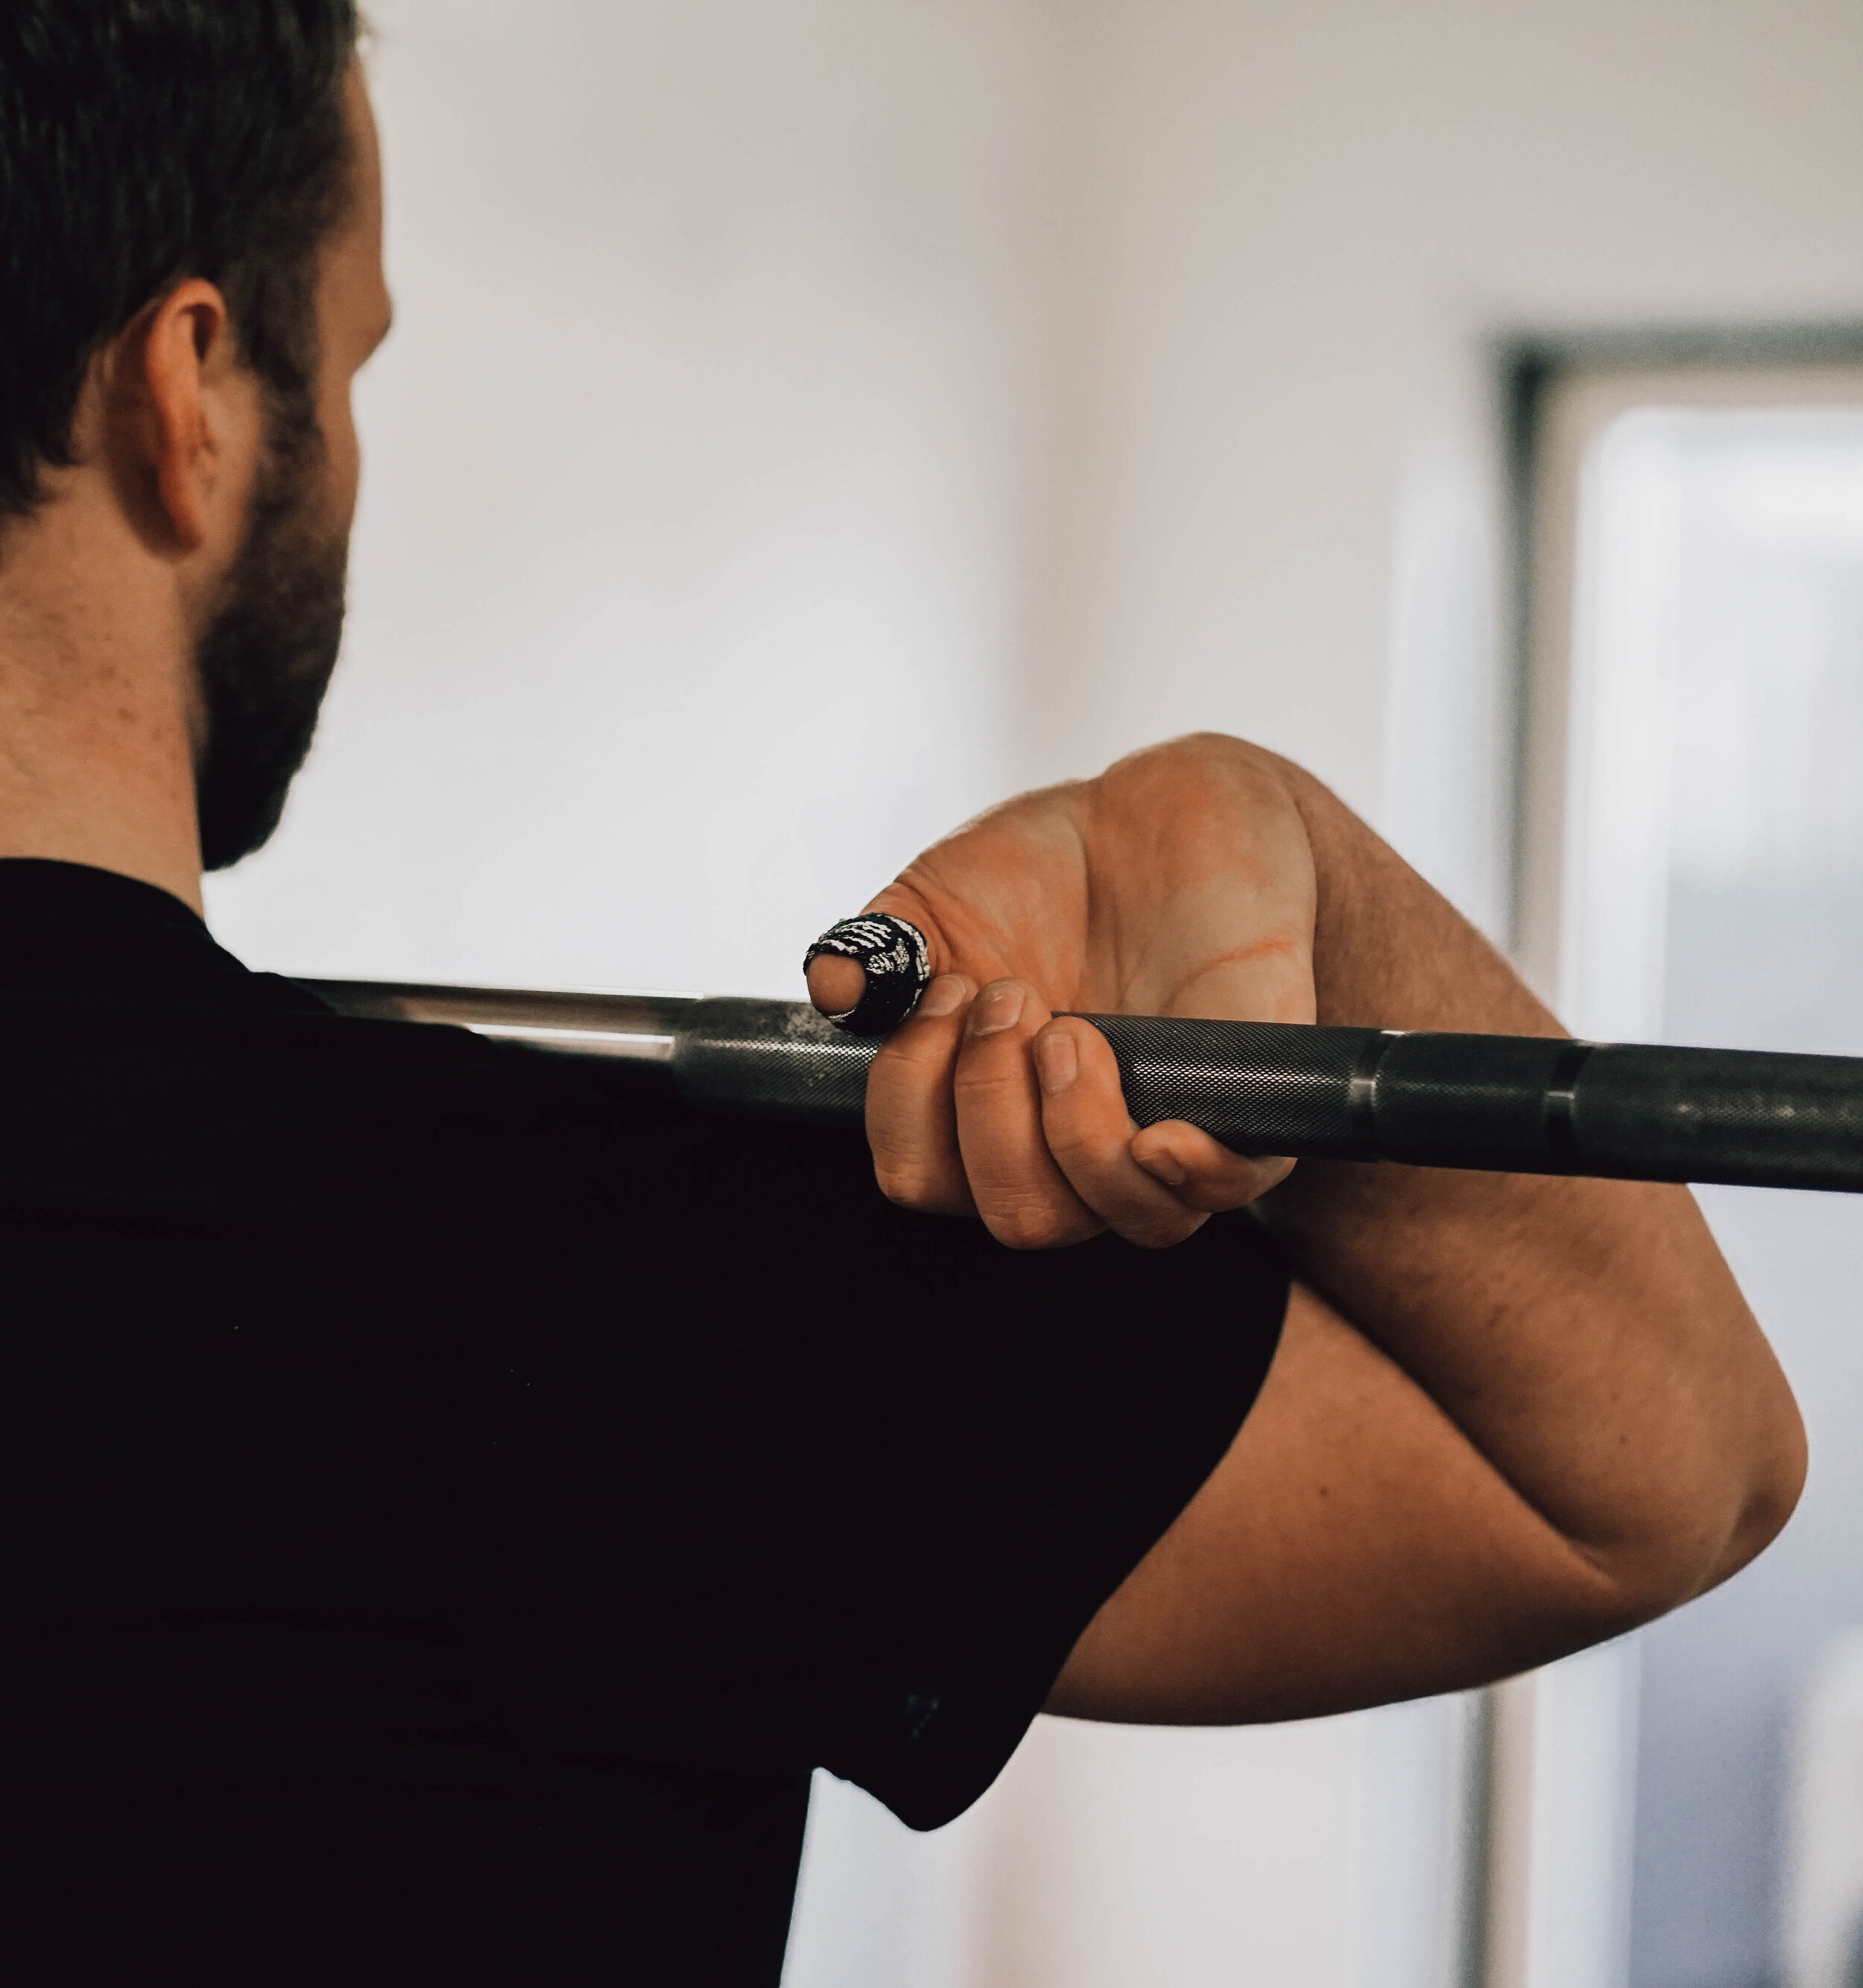
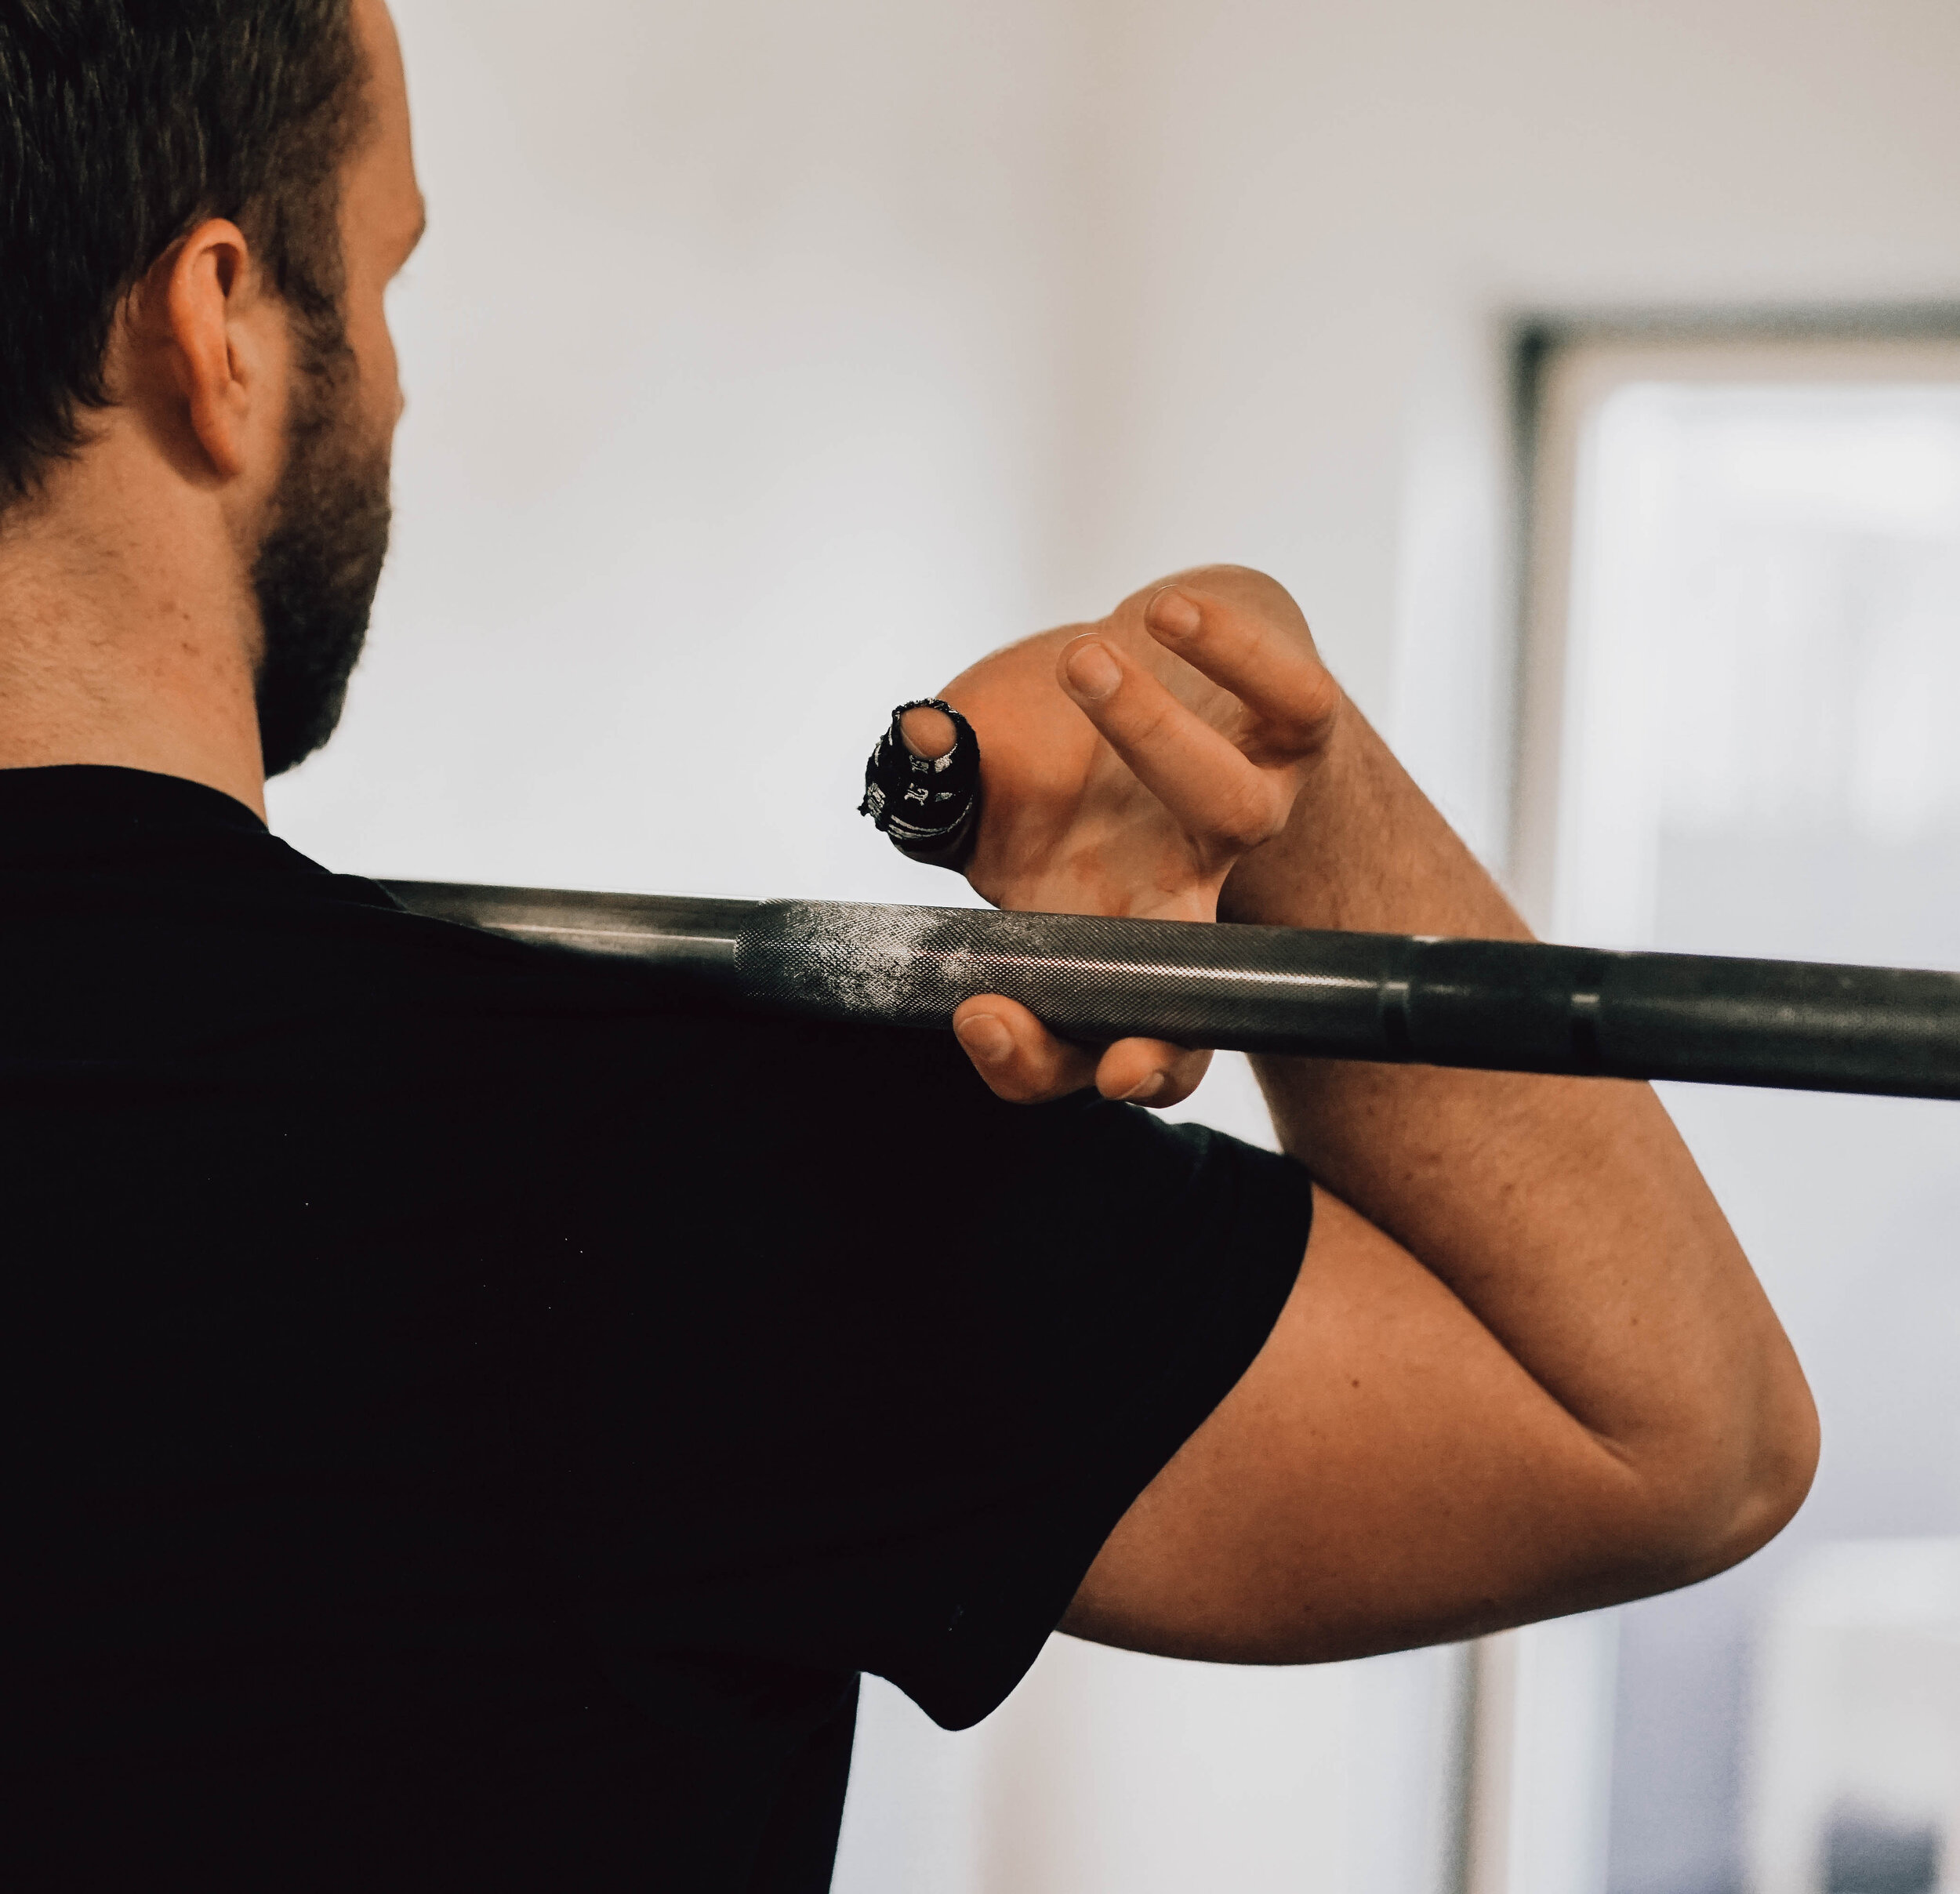
Hook Grip

Hook Grip
Use a hook grip; grab the bar with your hands, wrapping your thumbs first over the bar and your fingers over your thumbs.
This helps to improve your grip and is crucial for pulling heavy loads. It’s a good idea to practice using a hook grip from the very beginning. This is the best way to get used to the mild discomfort that many face when they begin to use it.
Set Up Position

Clean Set Up position
Keep in mind that there are as many different “correct” starting positions as there are different body types. Individualized adjustments must be made and may even change as the athlete advances. Height, body proportions, and mobility are just some of the factors that influence how the lifter will set up for their clean and jerk.
Generally speaking, the best stance is one that will allow you to stay balanced on your midfoot and maintain a straight back as you stand with the bar. In the start position, your hips should be low (just above parallel) and your shoulders inline or slightly ahead of the bar. Knees out, chest up, arms straight and look at the horizon.
PARTS OF the clean
The Fist Pull
Set your feet about hip distance apart distributing your body weight evenly across your base.

Finish Position of the First Pull
Hold the bar with your hands at about shoulder width apart.
Keep your arms long, turn your elbows out, and brace your core.
Lower the bar to mid-shin keeping your hips lower than your shoulders and a straight back. (Lowering the bar in this way isn’t mandatory to execute the lift however it helps to reinforce the bar path. When there are plates on the bar, we can set up directly from the floor).
Your feet should be rooted into the floor with your shoulders just barely ahead of the bar.
Direct your chest and gaze straight ahead.
Begin to extend your lower body activating your glutes and hamstrings and pushing your feet firmly into the ground.
Continue to keep your abs and lumbar tight as you rise, and your shoulders in front of the bar.
As the bar passes your knees, you can steadily accelerate.
Elevate your chest as you open up your hips.
When your hips and knees are almost completely straight, it’s time to prepare for the fastest part of the lift, the hip extension.
You have to maintain good posture, stay balanced, and time the pulls, extension, and turnover well in order to pull it off. Be patient, and slow down just a bit when you’re practicing so that you can be conscious of these elements.
(Hanging) Hip Extension
There are variations of the clean that begin below the knee, above the knee (also known as hang, or launch position), and right below the contact point. If you’re just starting out, practice initiating your lifts from hang position and as you become more confident and consistent in your mechanics, work towards starting from the ground. When the lift starts from the floor there is more room for error.
Explosive hip extension is the driving force of this lift. It involves maintaining the bar close to your body during the first pull and then using your lats to bring it in even closer so that it can make contact at the upper thigh precisely when you open your hips.
The brush of the bar facilitates power transfer allowing us to move the weight to the desired position with serious speed.

Brushing Upper Thighs
Begin with the bar just above your knees.
Your knees should be slightly bent and your shoulders just ahead of the bar.
You should feel a stretch in your hamstrings.
Keep your abs and lower back tight as you open at the hip bringing the bar up to your hip crease.
Avoid banging the bar against your legs, but keep it close enough so that as you extend your hips, it brushes your upper thighs.
This is the contact point where the bar will accelerate so quickly that you will be able to transition the bar to the font rack.
When performing the lift, the brush of the bar has to be extremely precise and explosive, but as a drill, it’s a good idea to start slow for the sake of accuracy.
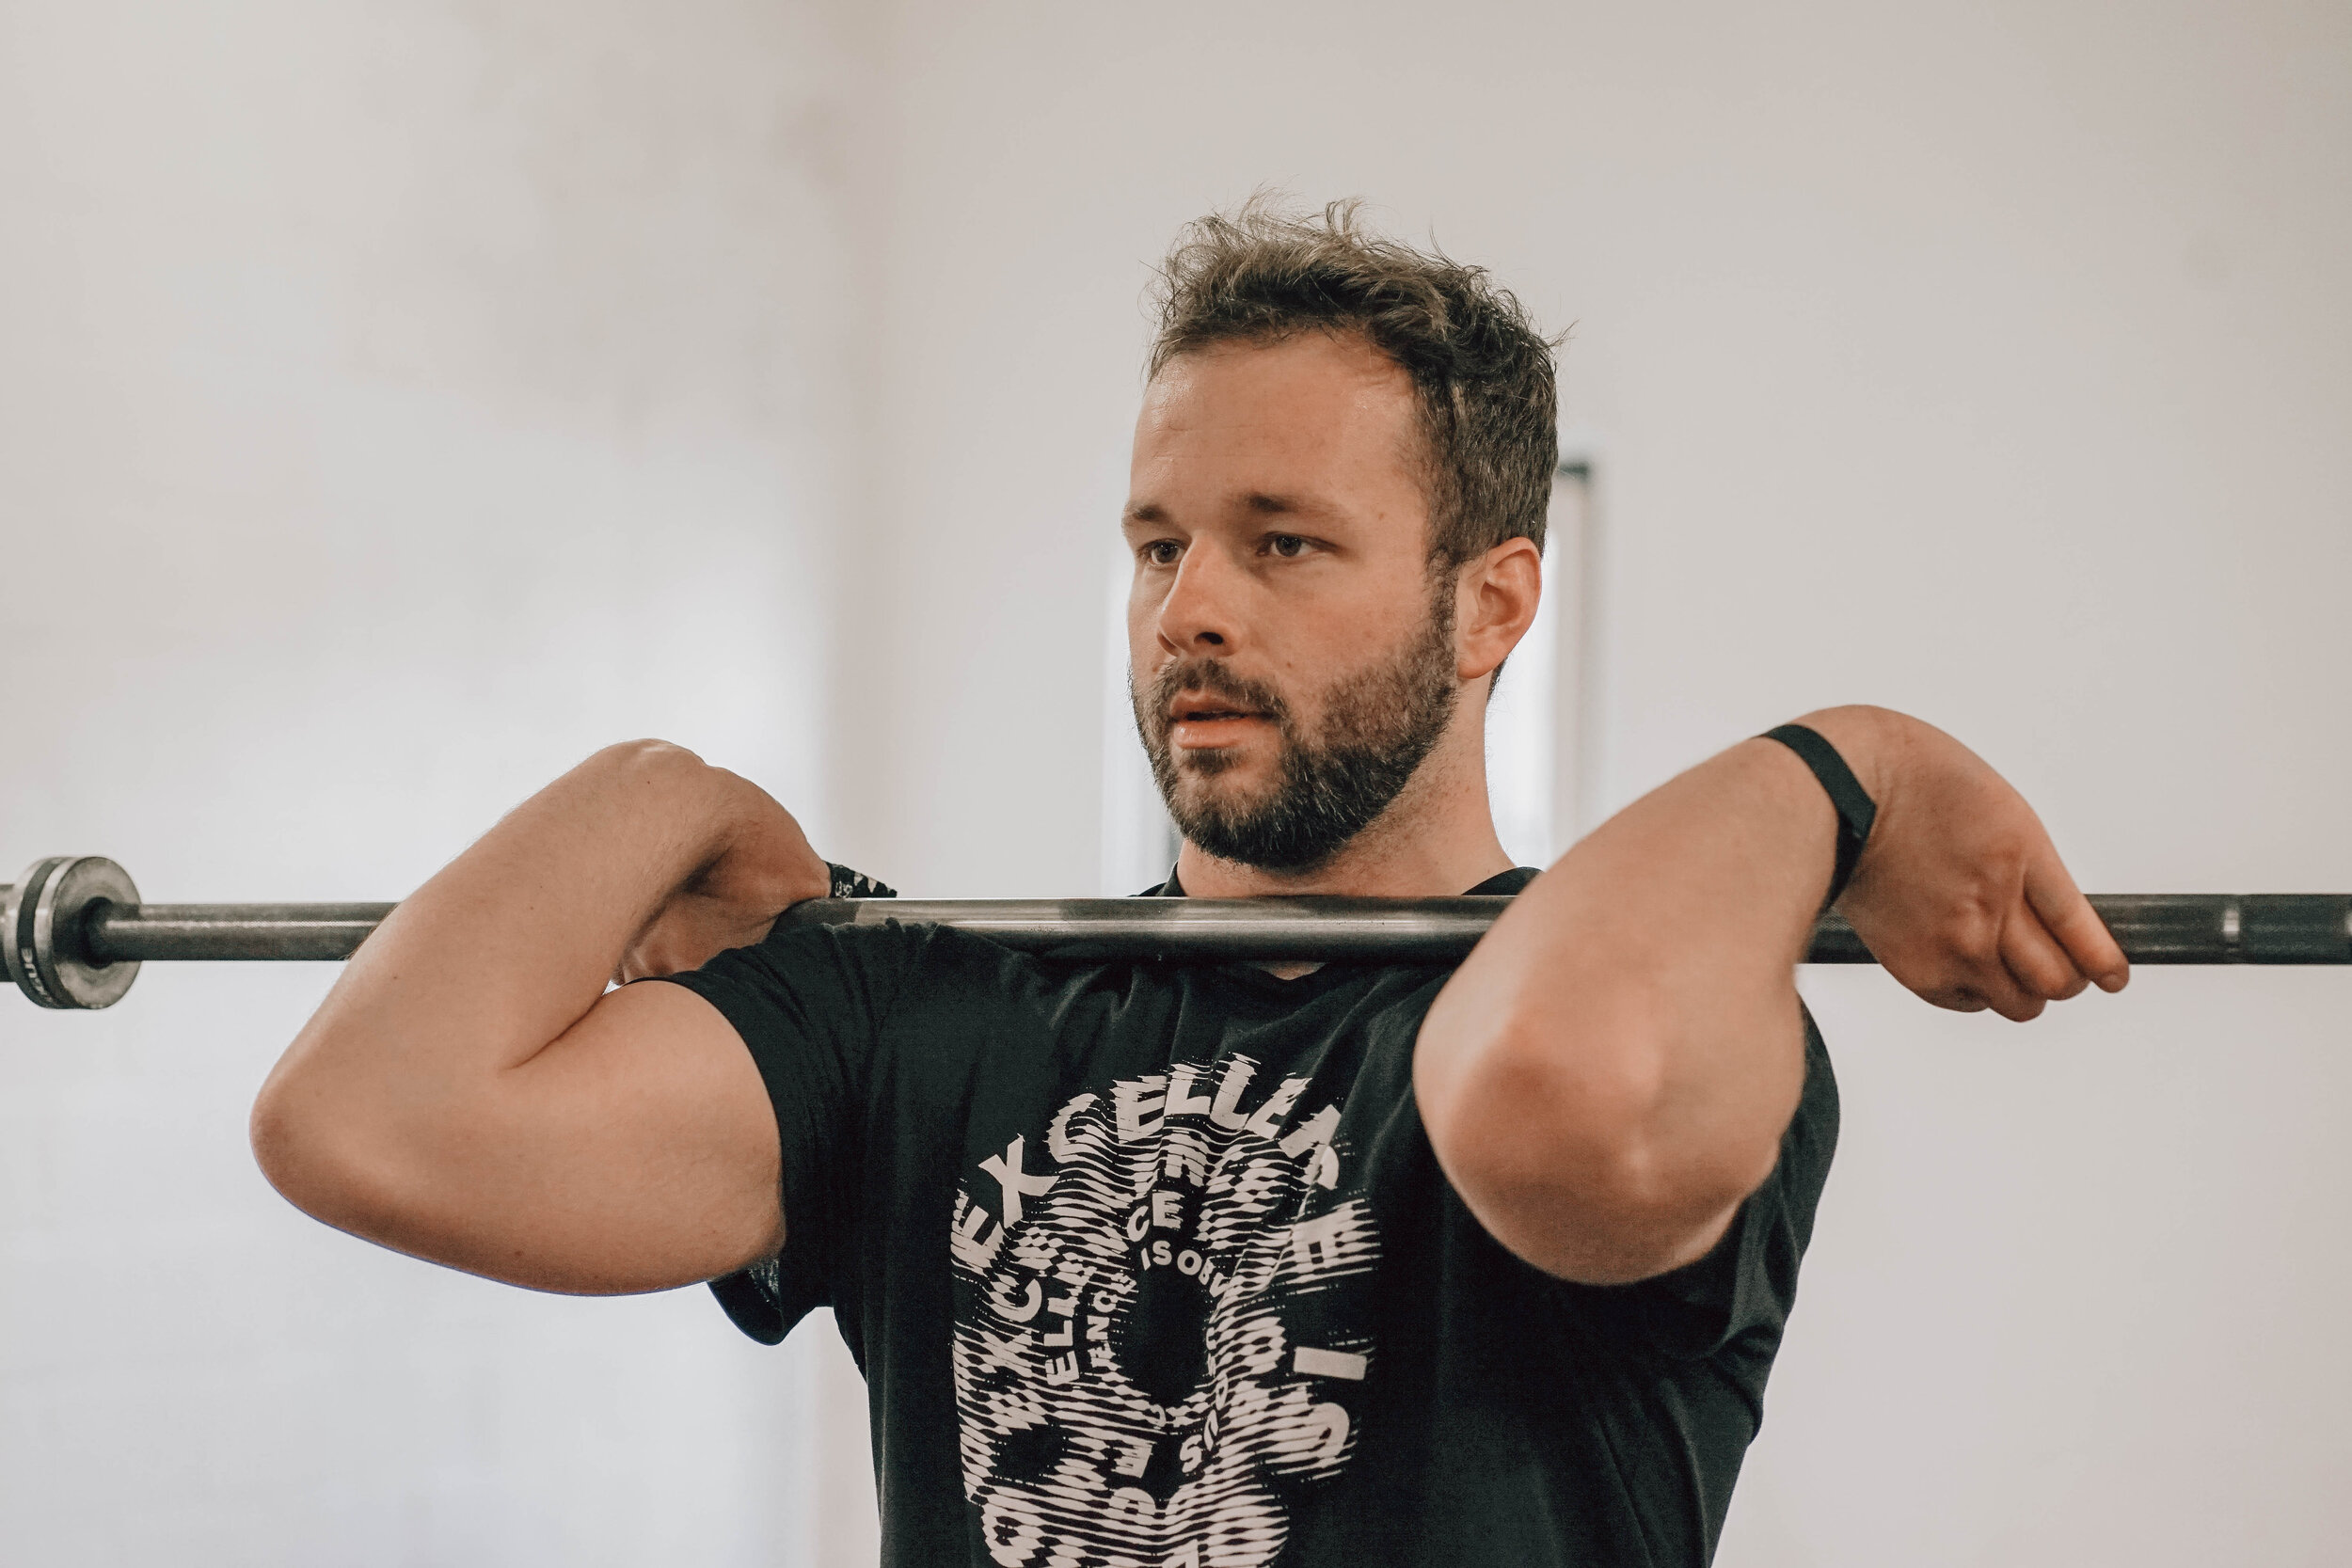
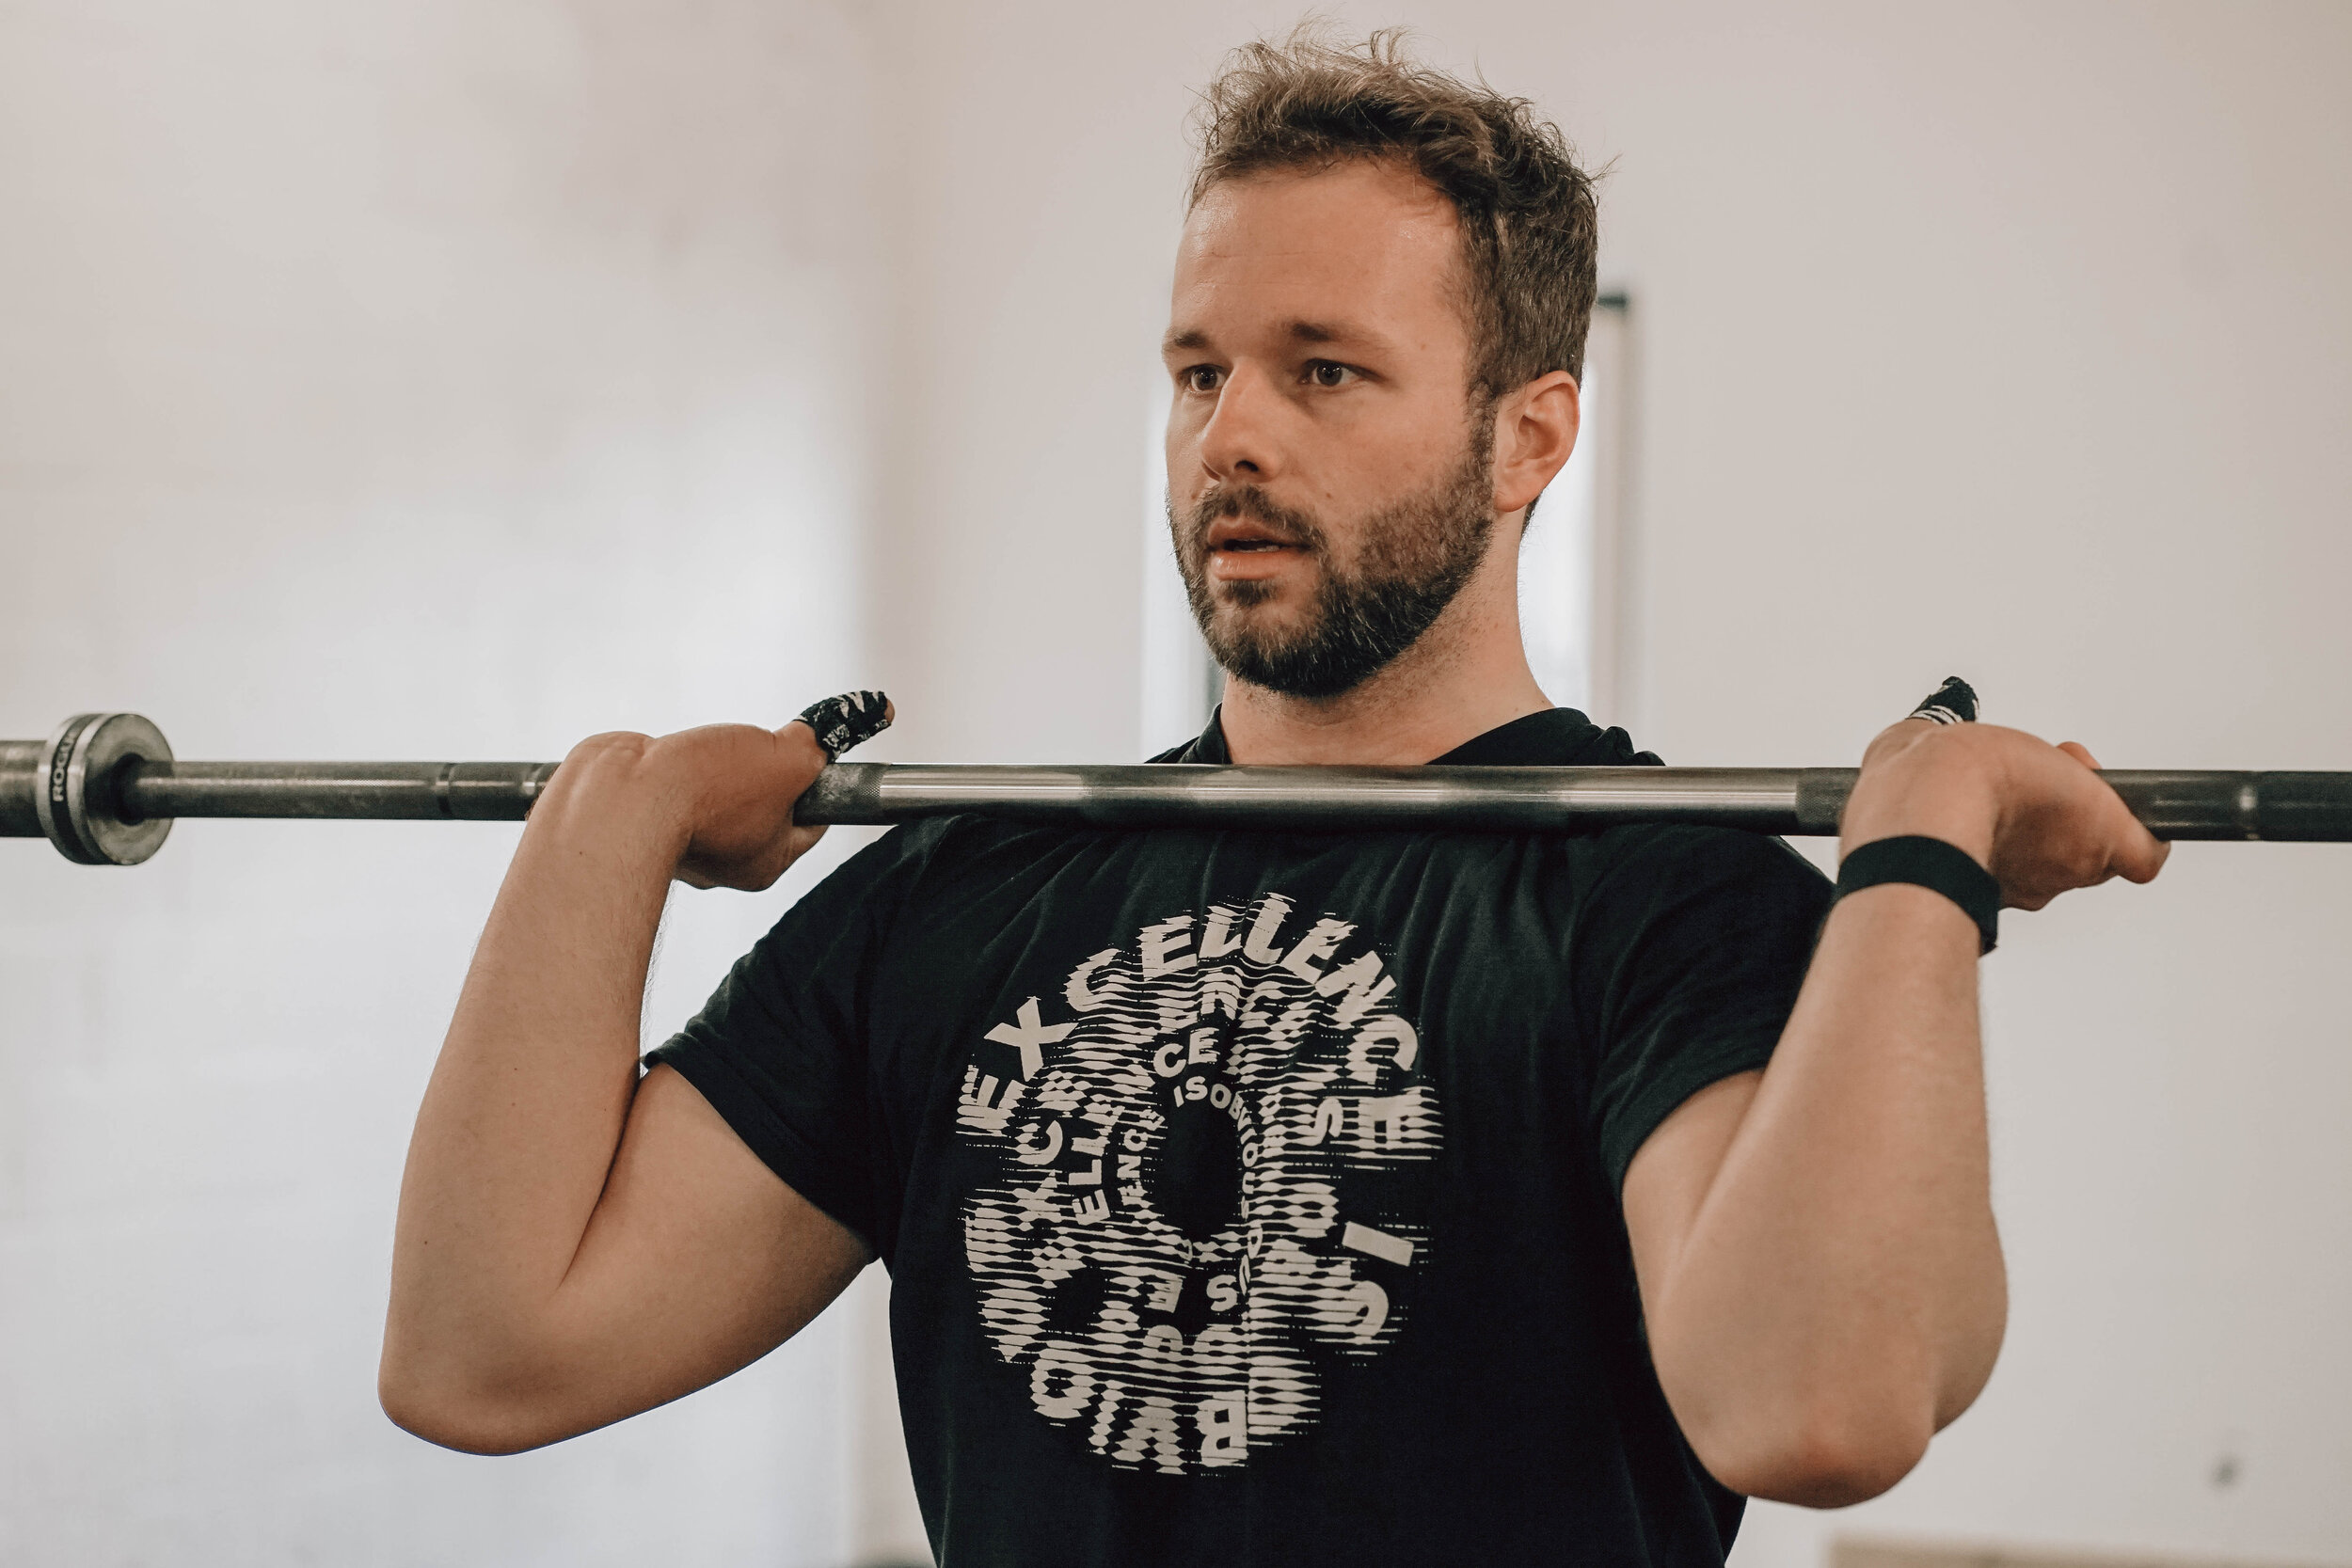
Front Rack
In an optimal rack position the bar will be mostly rest on the lifter’s shoulders, but the weight is supported by the trunk.
Although the hands are also placed under the bar, they shouldn’t really take on much of the load. They do, however, help to lock the bar in front rack as you stand from the clean and/or initiate overhead lifts. This is where being able to hold the bar with a full grip becomes invaluable.
Better grip equates to better control over the bar however many athletes lack the flexibility in the wrists, shoulders, and lats required to keep the trunk vertical and the bar parallel to the floor. As a result, they may have to compensate by using an open-handed grip, allowing the bar to rest only in their fingers. Even this can cause a lot of discomfort for some lifters, putting excessive load on their wrists and elbows.
A comfortable and sturdy front rack position is crucial to be able to execute the clean so make your mobility a priority!
Front Squat
Were you able to support the bar properly in front rack position? Great, because any limitations you have supporting the bar in front rack while standing will only be intensified as you squat down.
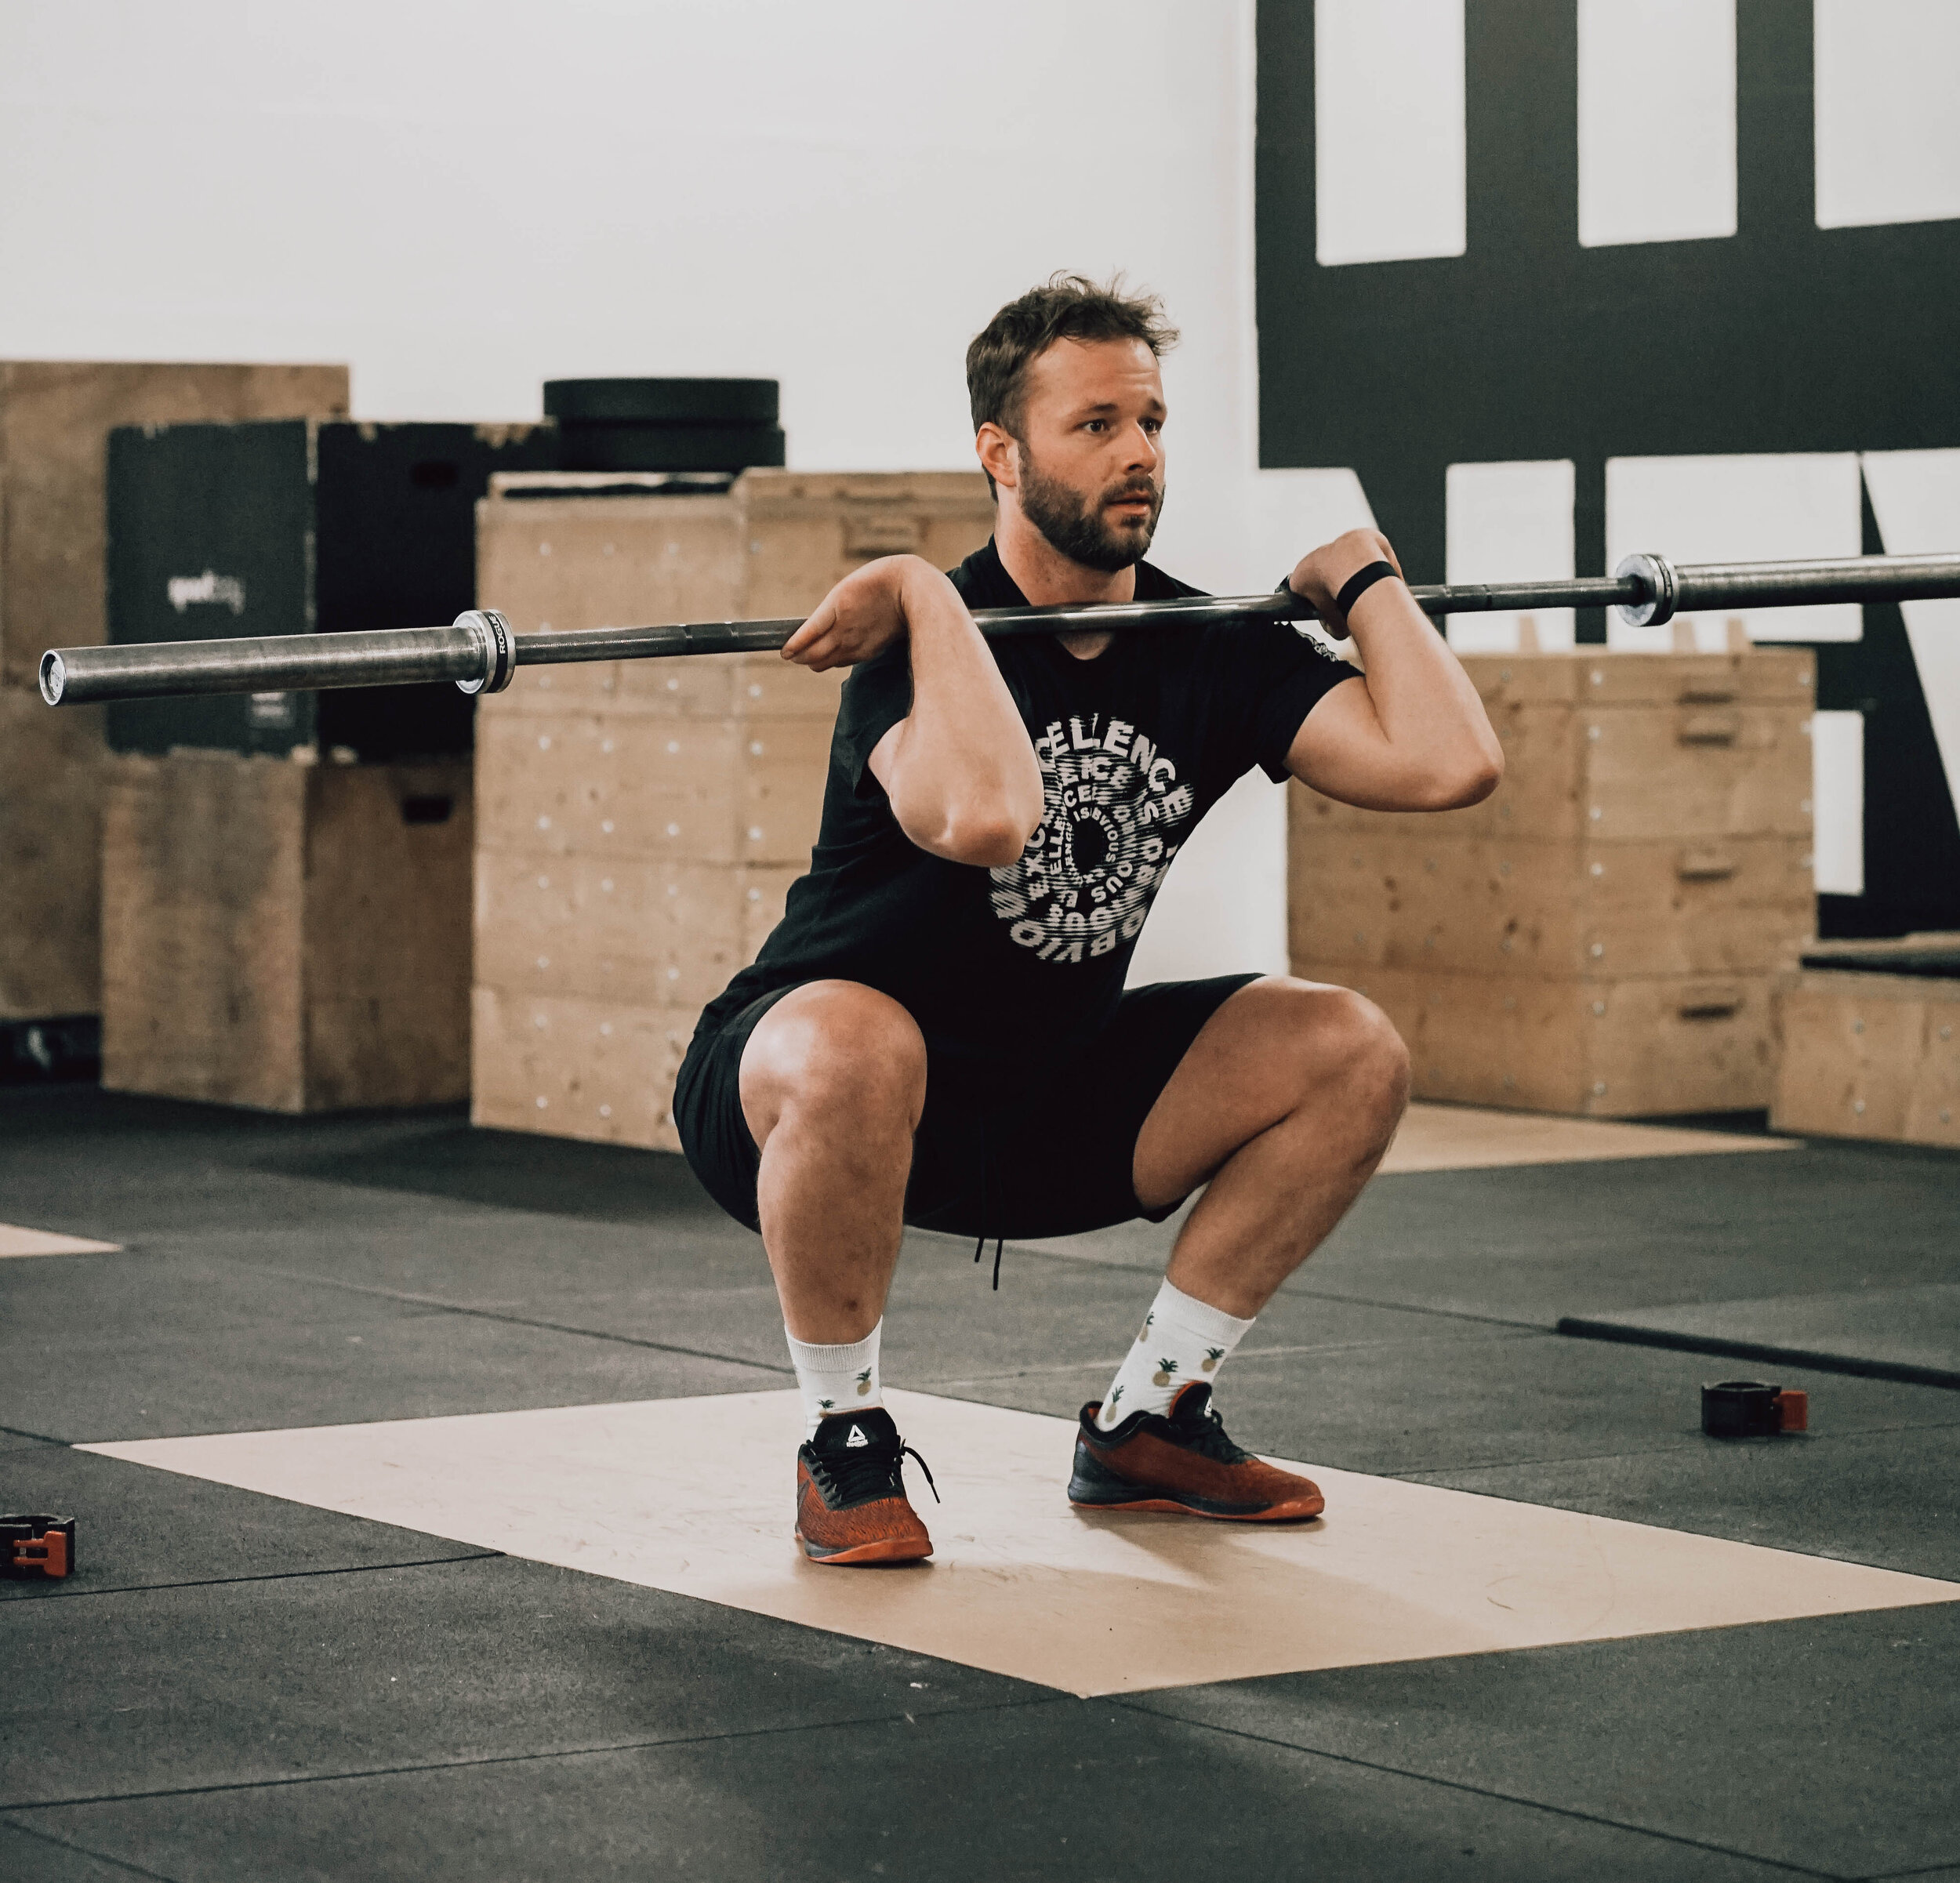
Front Squat Bottom Position
Start with your bar in front racking position.
Your feet should be about shoulder width apart with your toes a little turned out.
Brace your core and keep a straight back.
Send your hips back as you bend your knees as much as possible.
Ideally, your hip crease will be lower than your knees, and your trunk vertical while preserving your lumbar curve.
You should be able to maintain the bar parallel to the floor.
Once you’ve reached the bottom of the squat, drive with your legs to stand up, staying as upright as possible.
Even if you’re able to get into these positions, any experience of discomfort calls for some special attention to prepare your ankles, knees, hips, shoulders, lats and thoracic spine.
Stay consistent with your mobility drills (incorporate into your warmup!) and you’re sure to see improvements in your lifting technique.
How can we perfect the clean
Now that we know how to set up and where the bar needs to go, we can practice getting there. For those who are starting out, slow and lightweight is the way to go. Going slow and working with less load will help you stay conscious of moving correctly and maintaining the correct bar path.
Muscle Clean
The muscle clean is a technique exercise that can help the lifter practice the transition to front rack, known as the turnover.
It can also be used to improve the strength, timing, and fluidity of the turnover.
Set up for your first pull.
Keep the bar close to the body and accelerate it towards the hips.
Once your hips are extended, shrug your shoulders, lift your elbows, and keep your wrists in.
When the bar reaches chest level, flip your elbows up and around the bar aggressively bringing it into front rack.
To avoid the bar from crashing down on you, stay tall and don’t bring the bar up too high.
You’ll want to be in a vertical position just before your turnover.
Gently receive the bar in front rack with an upright torso.
Power Clean
To execute this variation, the lifter must be able to produce enough power to raise the bar and enough speed to catch it almost immediately after.
It’s a very forceful lift, but because there is less range of motion than in the squat clean, training this exercise can be useful for those who lack mobility in the squat.

Power Clean Catch Position
Like the previous variation, the power clean includes controlling the first pull from the floor and driving bar towards the hips before reaching triple extension (open angles in your ankles, knees, and hips).
From there, you must pull yourself under the bar jumping your feet out slightly to catch the bar in a high squat. Generally, a power clean is received in a squat parallel to the floor or higher.
Although the bar is received lower than in a muscle clean, you should still go for full extension before pulling yourself under the bar and landing in the receiving position.
Power cleans are often used in CrossFit because they can be performed quickly and they are easy to cycle. Barbell cycling, or touch-and-go(TnG) is a way of linking several repetitions of a lift without releasing the bar. This allows the lifter to perform the lift at a greater volume in less time. This is an advanced technique that can be applied to all lifts however, since the bar is almost always in motion, it is not recommended for novice lifters. It is much more important to practice each lift until consistency and proper technique is achieved.
Squat Clean
The squat clean is perhaps the most complicated versions mentioned in this guide. This is the full lift and is especially used in Olympic weightlifting competitions when finding max weight is the objective.
Given that you have the technique and sufficient mobility, you should be able to move the most weight in this variation up the movement.
Execute the first pull and hip extension.
As the bar continues to rise during the hip extension phase, pull yourself down under the bar while moving your feet into your squat stance.
Rotate your elbows up and under the bar to complete your front rack position as you sit down into the squat.
Once you’ve securely caught the bar, keep your chest and elbows high as you stand the bar up.
THE JERK
OK, so you’ve landed the clean, but can you jerk it?
The tricky thing about a two-part lift is that you don’t always get a chance at the second part so when the moment comes, you’ll want to be ready. The technique for the jerk must really be on point because you’ve already exerted yourself in the clean.
Moreover, since we’re bringing the bar overhead, accuracy, stability, and control must all come together. This is yet another reason why we practice cleans and jerks separately.
The Jerk Set Up
The jerk starts from a standing front rack position. Just like when we perform other overhead presses, we can use a rack or jerk blocks to hold the bar until we’re ready to lift.
If you’ve been lifting for a while now, you’ve probably realized that there’s more than one way to rack the bar.
The front rack position we use in the clean (keep those elbows nice and high) and the one we use in other overhead pressing movements are different. Consider that these rack positions have two different purposes: the clean rack prevents the bar from escaping as the athlete recovers from the clean.
The jerk rack prepares the lifter to push the bar overhead. The clean rack and jerk rack are the same in that the bar lays across the shoulders of the athlete and the load is supported by the core.
The jerk rack differs in that the elbows can be lower (though still ahead of the bar) and kept slightly out towards the sides.
This positioning allows you to take a fuller grip on the bar and facilitates the bar’s drive over your head.
When the clean and jerk are performed together, the lifter will change from clean rack to jerk rack by standing up from the clean violently, allowing them a brief moment to unload the bar and re-rack.
The Dip, Drive and Catch
There are three phases in this jerk movement: the dip, the drive, and the catch.
In the dip, the athlete loads their legs by carefully descending a few centimeters with the barbell.
This is done to generate force for the drive; the lifter suddenly extends upward to unload the bar and transition it overhead.
The catch refers to the point at which the lifter locks out the arms securing the bar overhead.
From your rack position, start with your feet at hip width apart.
Brace your core by taking a deep breath in and holding it as you push your trunk outwards.
Keep your weight evenly distributed through the middle of your feet to maintain your center of gravity.
Gently bend your knees while maintaining a vertical chest and the bar parallel to the floor.
The dip should be short and controlled to avoid losing balance or trajectory.
Once you’ve reached the bottom of your dip, drive your legs into the ground and extend your legs and hips.
As you extend your lower body punch the bar up and pull your body under. Jump your feet out to a stable position as you lock out your arms beside your ears and the bar overhead.
Make sure you have completely stabilized the bar before recovering your feet and returning to a standing position with the bar still over your head.
THE JERK VARIATION
Across these variations we’ll see that the dip and drive remain the same, but the foot placement and depth at which we receive the barbell during the catch is different. Let’s have a look at some of their applications.
The Split Jerk
The split jerk ends with the feet jumped out into a half lunge.
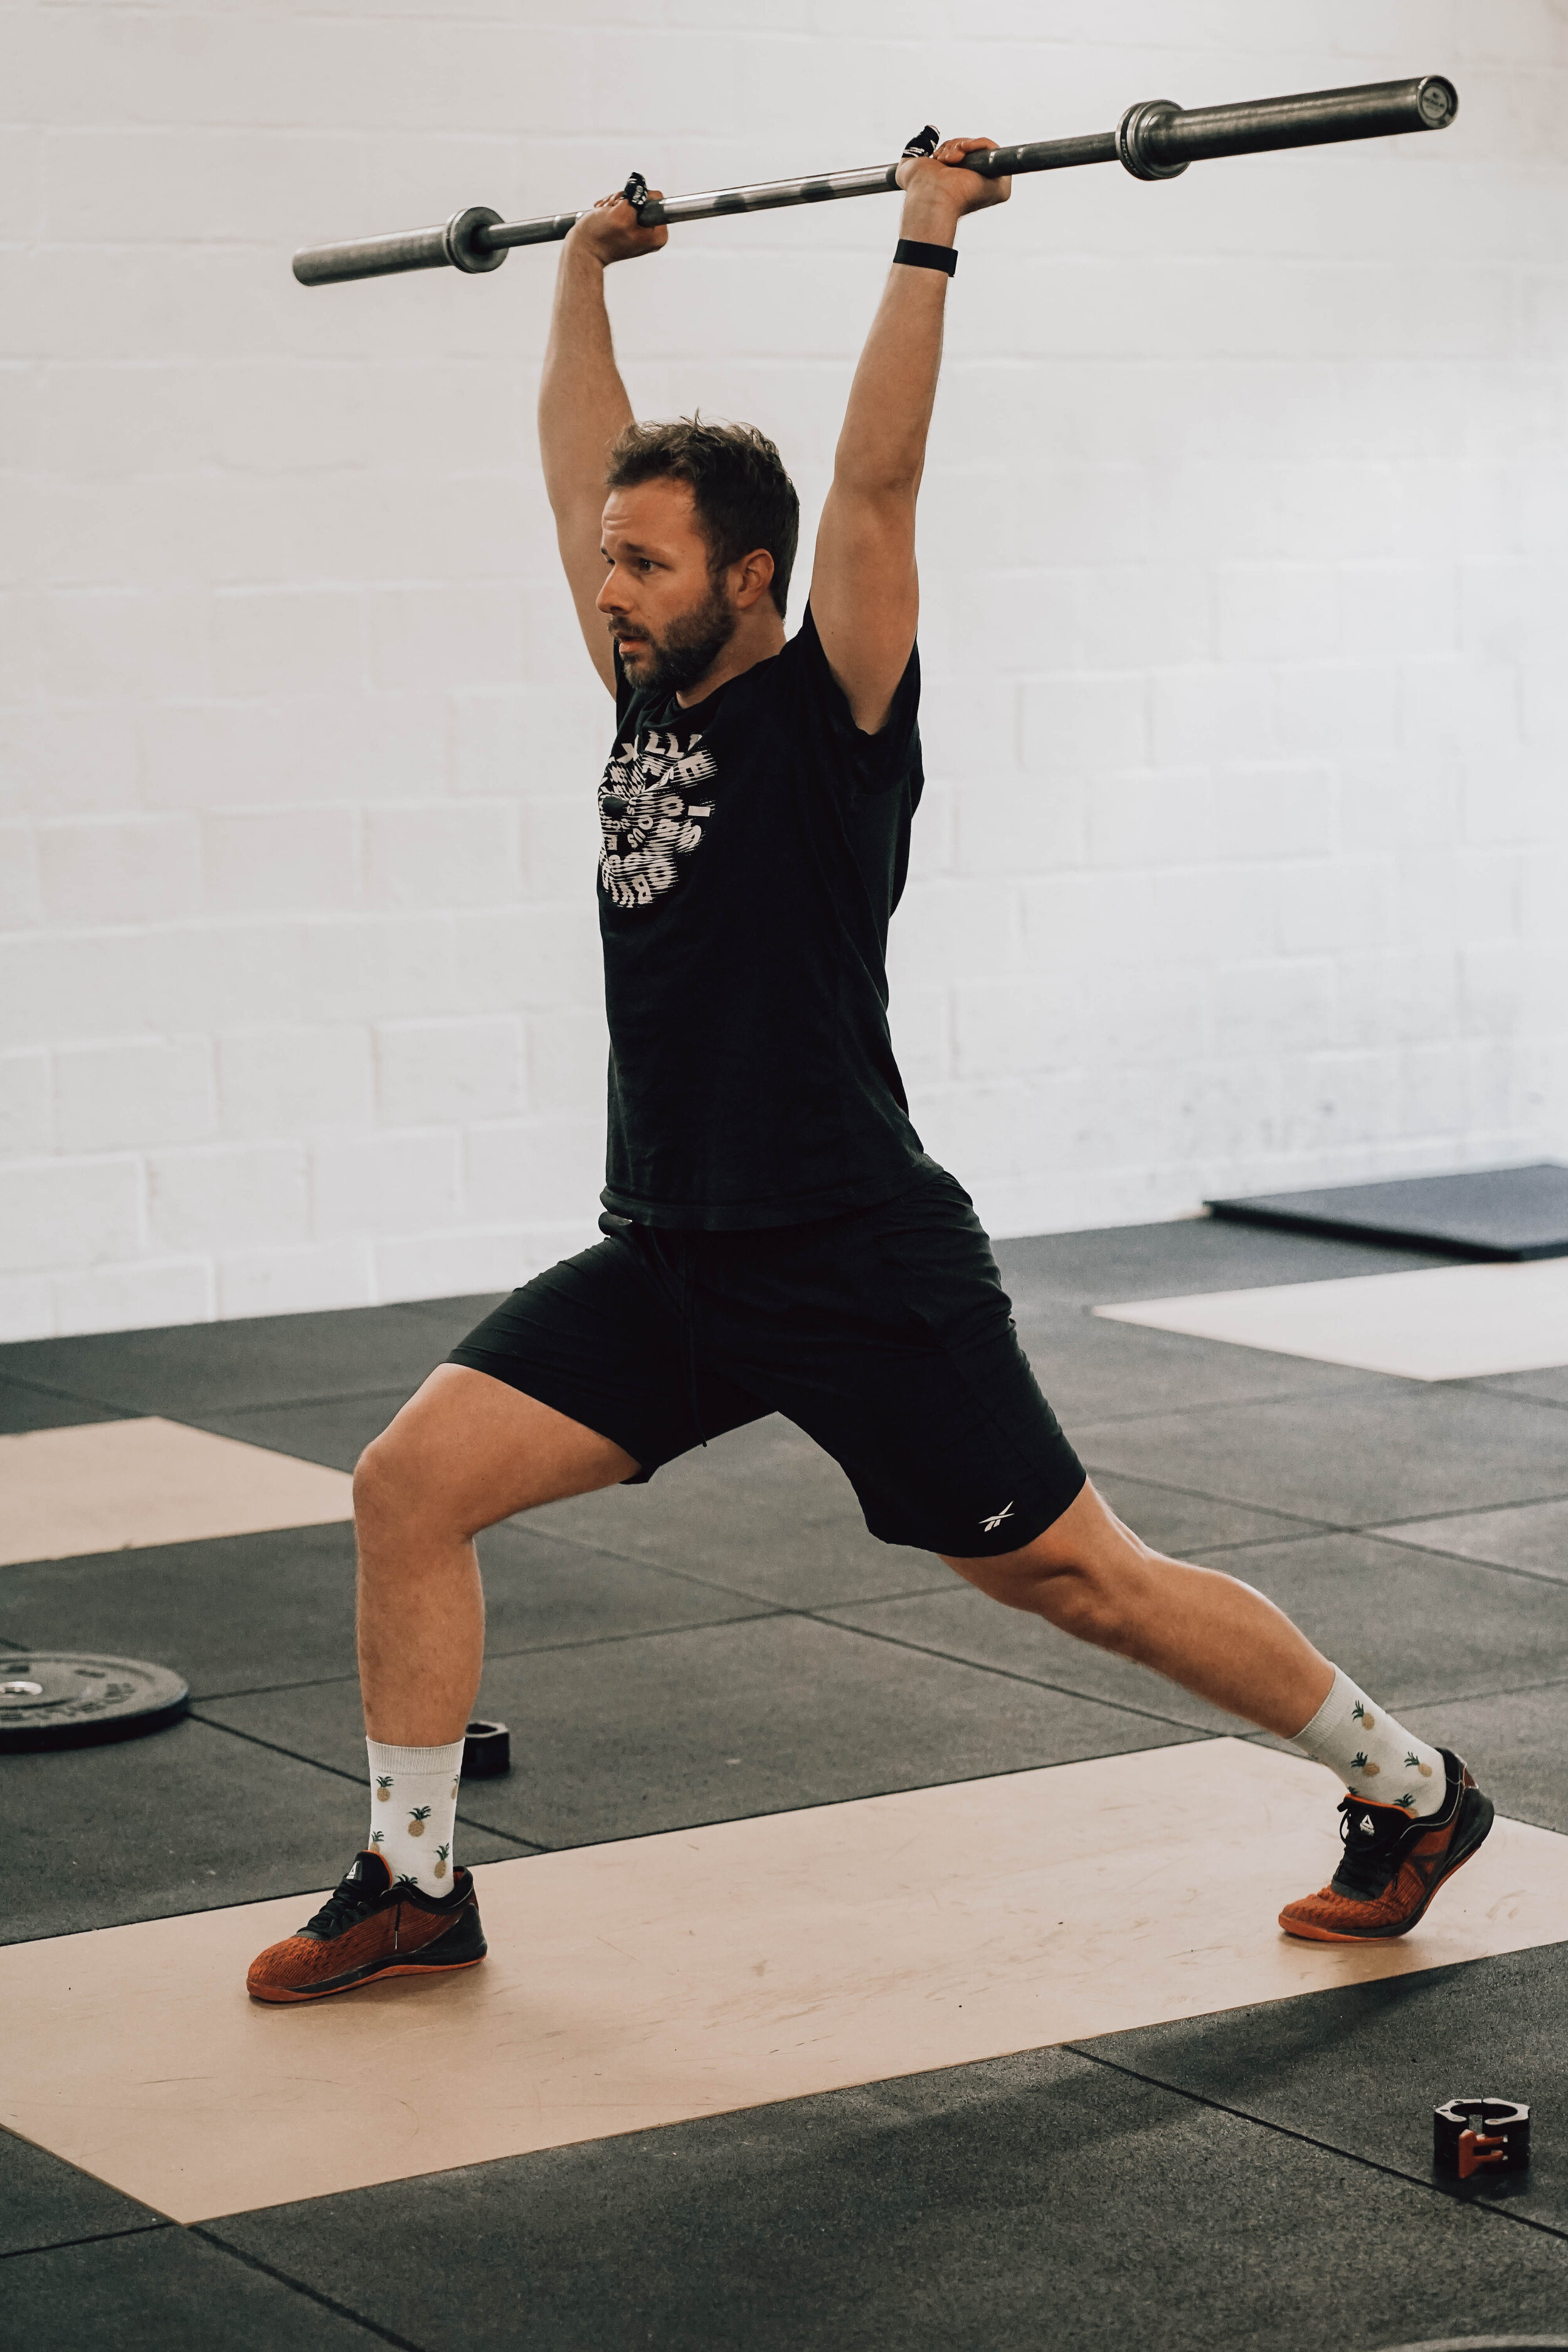
Split Jerk
As you push the bar during the drive, jump one foot ahead and one foot behind the centerline of the bar.
Lock out your arms and land with both knees bent and with your feet shoulder-width apart.
The front shin should be vertical; the knee should stack over the front heel.
The back knee is slightly behind the hip with the back heel off the ground.
This variation is more widely used in Olympic weightlifting. Most athletes can put up more weight as this foot positioning provides wider base of support. This type of jerk is also a good alternative for lifters who are limited by their mobility.
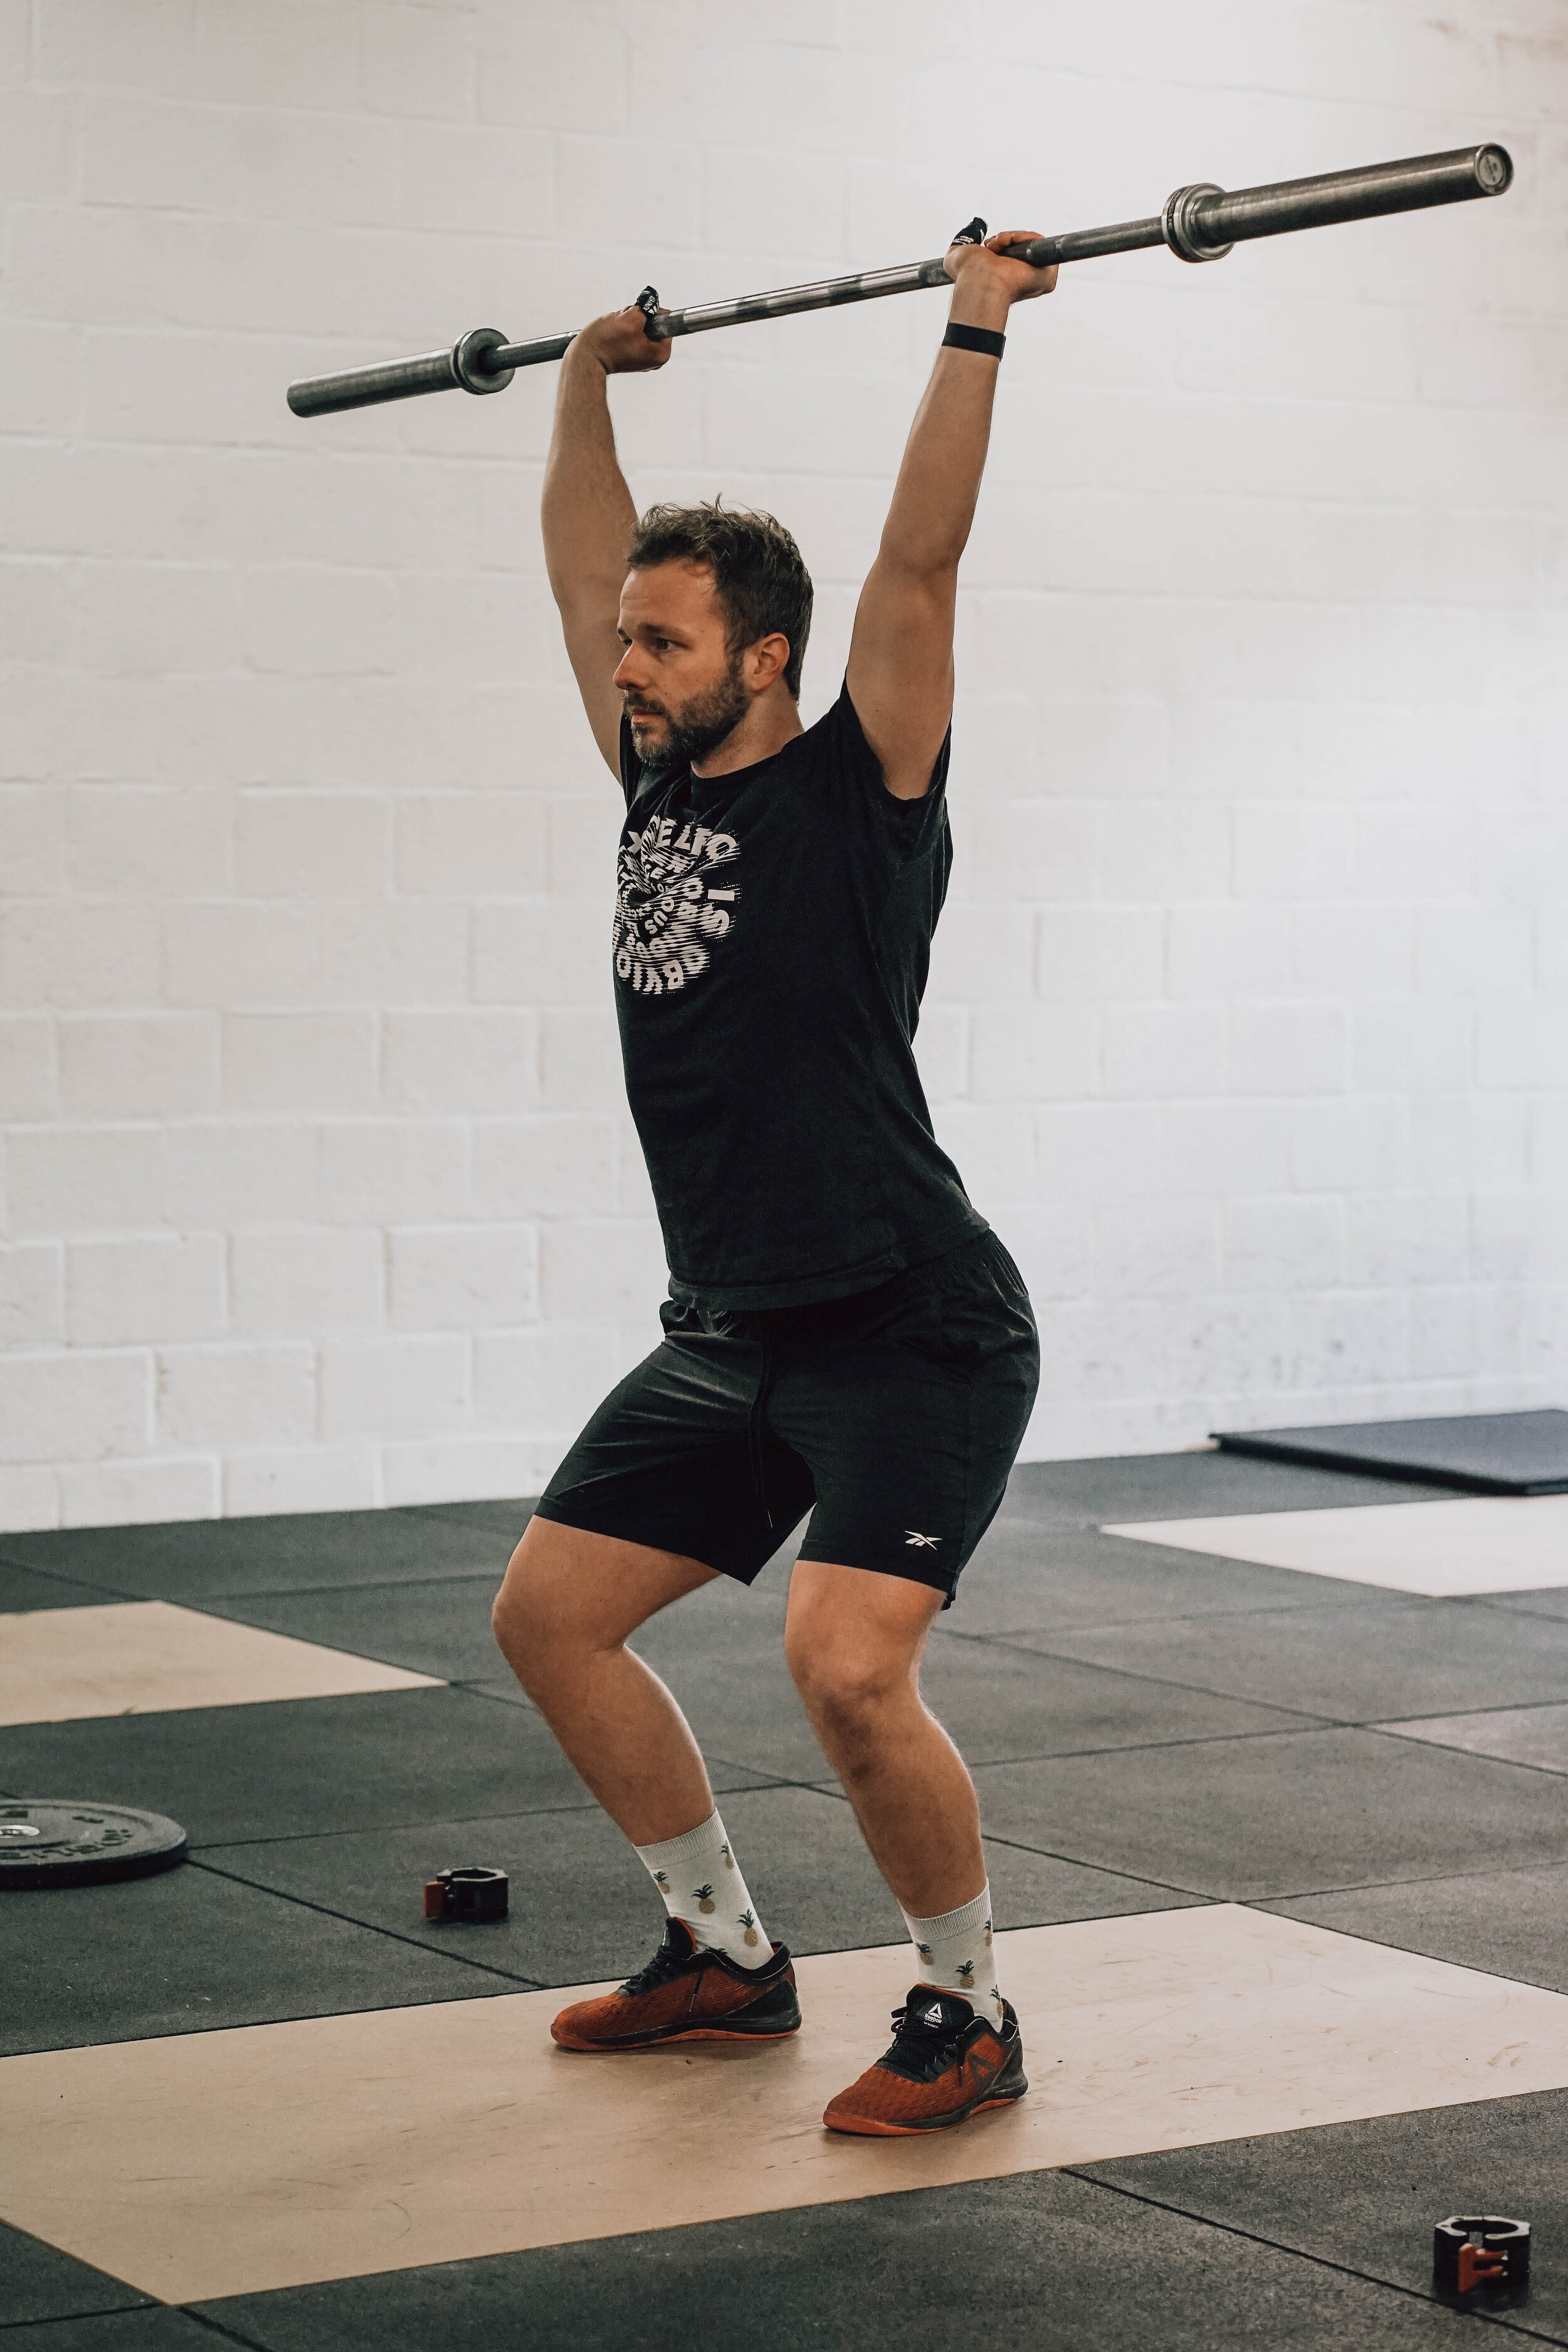
The Power Jerk
In this variation, the feet are displaced into a quarter squat.
Finishing the drive phase, push the bar up with your arms as you open your hips.
As you approach lockout, quickly jump and land your feet shoulder width apart lowering yourself under the bar in quarter squat.
Push Jerk
The Push Jerk
Like the power jerk, the push jerk ends in a quarter squat however the feet don’t move from the stating position during the lift.
This variation really forces the lifter to extend vertically as they unload the bar and to continue to push as they lower their body into the catch position. Simply dip, drive the bar upwards and lower yourself under in quarter squat as you lock out your arms.
The power and push jerk are especially used in CrossFit because they can be performed and cycled more quickly than a split jerk.
It is crucial to maintain a vertical dip as the lifter will have less time to get under the bar once they have unloaded it.
common mistakes
Lack of mobility, lack of strength, lack of bar proximity in the pull. Any or all of these faults can be to blame if you’re constantly missing lifts or if your catch position looks wrong.
Because so many things are happening at once in these lifts it can be difficult to know what’s getting in the way of a success. Let’s look at some of the most common mistakes the beginner and intermediate lifters make in the clean and jerk.
Bar crashing and Bruised Collar Bones
This is often the result of failure to meet the bar when transitioning to front rack position.
All too often, the lifter tries to “outrun” the bar by diving into the squat too quickly and letting the bar crash down on to their shoulders. Our goal in the clean is to pull the bar high and meet with it before riding down into the squat, absorbing the weight before standing it back up.
A tall clean is a drill that focuses on staying connected as you pull under the bar.
With the bar at your waist, shrug your shoulders up and raise the bar pulling it in towards yourself as your elbows complete the turnover entering front rack position.
Start by catching the bar as you would a muscle clean, with the hips already extended.
Then, work toward receiving the bar in quarter squat, and eventually to the full squat position.
Similarly, this crashing also occurs when the bar is too far in front of the lifter following triple extension. In this case the lifter tries to bring the bar back in by “reverse curling”, causing it to fall forcefully into their reception.
We can correct this error by practicing no feet cleans, a variation which reinforces vertical rather than forward extension. Because the base of support doesn’t shift during the movement, the lifter is forced to extend vertically or miss the lift.
Perform your clean as normal without letting your midfoot separate from the floor. It may be necessary to start your feet wider so that you are able to receive the bar as usual.
Finally, the most obvious solution for this issue is to correct your rack position. As you’re in front rack, lift your shoulders, separate your shoulder blades, and keep your elbows high to prevent the bar from resting on your collarbones.
Early arm bend
On the surface, the clean looks like a rapid-fire transition from standing over the bar to being under it. For this reason, many lifters incorrectly use their arms to muscle the bar up so that they can sneak under.
In reality, this may work with lighter weights, however the lifter will be severely limited by their upper body strength.
The only way to successfully clean heavier weights is to be patient in the pull and allow your body to reach triple extension. This will raise the bar high enough so that the lifer has enough time to catch it smoothly.

Early Arm Bend
Practice patience and maintaining long arms in the pull by drilling slow or pause cleans.
Pause cleans are performed as squat or power cleans with the lifter coming to a full stop when the bar reaches below the knee, above the knee, and/or just before hip extension.
The lifter should hold the pauses for about two to four seconds in each or just one of these positions depending on the desired stimulus.
Pause cleans are a great way to help the lifter develop awareness of any bad habits in the first pull.
They can also reinforce proper positioning of the bar or be used to develop isometric strength.
Pauses can also be applied to the catch position of the clean and/or jerk to train the lifter’s ability to stabilize weights.
Dipping forward
Often, losing the barbell in the jerk can be attributed to the lifter’s feet and balance during the dip.
As you stand up from the clean take your time to set your feet as wide as necessary (about shoulder width) giving yourself a stable base. From here typically beginners will break at the knee encouraging the barbell in the front rack position to fall forward.
Rather than thinking of the dip as your body going down, think of it as going wide: push your knees out keeping the shins nearly vertical and chest high. This will help to preserve a straight path for the bar when you extend.
The dip should be relatively slow and controlled. When the barbell moves slower yet fluidly, it’s easier it is to reverse the direction of the load.